Monday, May 14, 2012
When Is The Last Time You Had A S'more?
S'mores Bites
Yields 12
Ingredients:
6 graham cracker sheets*
6 large marshmallows
12 Hershey's Kisses or Rolos, unwrapped
Directions:
Break graham cracker sheets in half, then cut each half into a circle using a 2 1/4" circle metal cookie cutter. *Older graham crackers that are left out in the air for a bit will be more softer and more pliable for cutting.
Using clean scissors cut each marshmallow into 2 halves.
Heat oven to Low Broil and place oven rack two levels below broiler.
Align graham crackers in the center of a cookie sheet about 1/2" apart from each other (you want them all to be near the center so they are directly under the broiler and cook more evenly at the same time). Top each graham cracker with a marshmallow with the cut/sticky side down. Place marshmallow topped graham crackers under broiler, watch them closely as they will toast quickly, allow to toast until golden, rotating pan with oven mitt as needed.
Once golden immediately remove from oven, place 1 Kiss or Rolo in the center of each toasted marshmallow and gently press down.
For best results serve warm, just like a real S'more. No campfire needed.
Wednesday, May 9, 2012
Condo Gardening
When we moved, we left behind 300 roses and huge numbers of daylilies, iris and almost any other perennial you can name. Literally, any perennial. Not to mention 36 tomato plants, along with cukes, squash, lettuce, beans and peppers
Condo living is a little different and has been an adjustment. Not much room for plants but we are trying to take advantage of what little outdoor space we do have.
We dug up 3 roses that were our favorites and which had been a birthday gift from my Mom (by special request). They are each a David Austen old fashioned rose named Happy Child. I think it is aptly named:
We have managed to do a little farming:
Here is my flower garden, on the front balcony. I am the only one out of 48 units that has plants out front. The geraniums like it here, unfortunately the homeowners association does not like plants or flowers. I received a notice:
Does this look like an unruly group of plants? Are they considerably over the boundaries and in the way of the walkway? To limit the number of plants are they suggesting two instead of three? Is this really so bad? Anybody want to guess what I think of the "homeowner association" gestapo?
Condo living is a little different and has been an adjustment. Not much room for plants but we are trying to take advantage of what little outdoor space we do have.
We dug up 3 roses that were our favorites and which had been a birthday gift from my Mom (by special request). They are each a David Austen old fashioned rose named Happy Child. I think it is aptly named:
Hot Peppers |
Basil (for homemade pesto) |
Condo Lizard |
"there are a large number of plants surround your entry, some actually out on the walkway area itself. The Board is requesting that you limit the number of plants. It is recommended that you not over water or use fertilizer."
Does this look like an unruly group of plants? Are they considerably over the boundaries and in the way of the walkway? To limit the number of plants are they suggesting two instead of three? Is this really so bad? Anybody want to guess what I think of the "homeowner association" gestapo?
Monday, May 7, 2012
What Are The Best Deals At Costco/Sams/BJ's?
Rachel, on her blog Holy Craft, does some price checking between Costco and grocery stores and reveals her findings. To me it seems that every thing is priced so it's at least $7, whatever the size.
There are a few things I go to Costco or BJ's for specifically (spring salad lettuce mix, peppers, green beans, olive oil, balsamic vinegar, deli meats, roasted chicken) and the rest I purchase at Aldi's, WalMart or the grocery store.
From Rachel: What I buy at Costco
Check out Rachel's blog - she also did an interesting series on what NOT to buy at the Dollar Store (here).
What do you buy at Costco/Sam's/BJ's?
Wednesday, May 2, 2012
Cinder Block Planter Redux
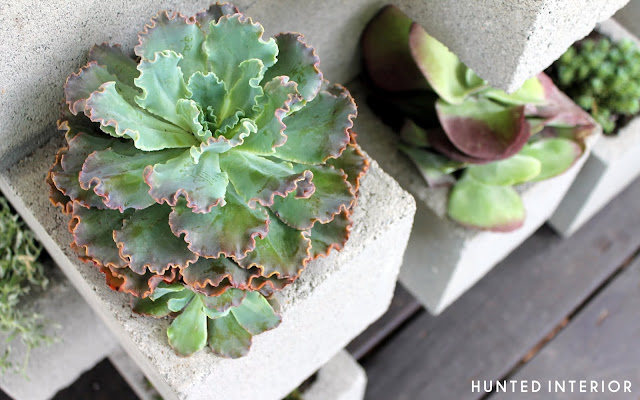
I love this idea - found at Kristen's blog the Hunted Interior. When I see the words "cinder block shelves", I don't get a really awe inspiring vision in my head. More like college dorm cinder block shelves. But this finished project is not only functional but looks great. These ain't your college dorm cinder block shelves.
BLOCKS ON THE ROCKS
Following the Hardware Cloth, cut a square of Landscape Cloth to keep in your potting soil.
BLOCKS ON THE ROCKS
I made a concrete block planter... Filled with gorgeous succulents... Just like everyone else...
But do you really think I would make a concrete planter just like everyone else? I don't think so! We made an outdoor bar!
I was completely awestruck when I originally saw Annette's DIY Cinder Block Planter on Apartment Therapy.
Pure genius. Since that post these planters have been popping up
everywhere. I knew I wanted in, I just couldn't figure out the
location.
Doing what I always do (& try to instill in all my loyal hunters) I
found myself digging around trying to find things to update our deck. I
knew I had some large old deck boards that I stained with my vinegar & steel wool mixture.
They ended up not being used for the desk, so they went back under the
deck... Calling to me. "If you Build Me. They will come!" After
doing a bit of measuring I realized I needed an outdoor bar. I mean who
doesn't need an outdoor bar?!? I had the wood for the top & I
needed a sturdy base. { Enter concrete blocks here } I literally threw
myself, my mom & the little's in the car & headed to Home
Depot. The project had begun.
Easy enough right? You stack up some blocks, plant some flowers, put on
a top... Done. Well it's never that easy. This is how we built our
Concrete Planter/Bar.
First up... Layout. Put on your strong arms, or borrow some if you can
& figure out your optimum layout. Mine ended up symmetrical
(shocker I know!) but if it had been wider I would have been all about
organized chaos. Also remember that staggering your seams will make for
a stronger structure.
Once you have your layout, take a picture, draw a diagram, make some
sort of reference so you don't forget. Disassemble your blocks &
start gluing them together. Easy right... yeah, we talked about that
earlier. It was like Goldilocks up in here. Our first tube of
industrial strength concrete glue (thanks neighbor) was so old it had
formed into a plasticy tube. No go. Our second attempt was using
StrongStick Adhesive by DAP. Seemed like it worked until it came apart.
Strike two. Ugh! I seriously almost scrapped the idea at this point.
One more try... { Enter heavenly cherubs singing }
We used two tubes of this magic adhesive in our caulk gun. I am proud
to say this thing isn't going anywhere without a sledge hammer! Let's
get to gluing.
Since we were turning this into a table, it needed to be in the realm of
level. We added wood shims to aide in this. Checking on every level.
Once done... Let it cure. I know you will be tempted to check. DON"T
just glue it & walk away.
After it is solid, as...well concrete, it is time to plant. We used
large squares of 1/4" Hardware Cloth & shoved it into the openings
that would be planted. I tried Chicken Wire as other sites had
suggested, but again, no go. I couldn't get it to stay. The Hardware
Cloth is more rigid & held much better for us.
Following the Hardware Cloth, cut a square of Landscape Cloth to keep in your potting soil.
And plant some GORGEOUS succulents.
At this point, if you just wanted a planter, you are done!
If you want to go all the way, like we did there are just a few more
steps... We used weatherproof Liquid Nails to glue our two boards
to each other. Followed by some metal plates for extra stability
Once the glue has dried, attach it to your planter... We attached L
brackets to the underside of the wood top that lined up with the
openings in the concrete blocks. This way it is a stable top, but it
can still be removed to aide in planting.
And every console needs a piece of artwork above it... I love how our door project transformed a plain door into a piece of art.
Our outdoor space has become a fun & bright space that we will enjoy
all summer! No really, the littles refuses to go inside now! I guess
all I can do now is pour a glass of lemonade, sit back & scheme up
my next project!
New Items from West Elm
The new West Elm catalog came today and I found lots of new items that I love, plus some continued favorites. And since I am an online shopper extraordinaire, I shall share them with you in an effort to shop vicariously rather than monetarily.
First up the the coral reef shower curtain ($39) and sea life decoupage tray ($12) and coral reef silk pillow cover ($39). Anything with coral is popular right now and these are an inexpensive way to look in-style without breaking the bank.
This layered side table ($149) would be a fun accent piece to add color to a room, or to let guests know you don't take yourself too seriously. For added functionality, it can be used indoors or out.
Screen-printed by hand on pure silk, this watercolor hummingbird
is art for your sofa ($34).
See anything from the new catalog that floats your boat?
Subscribe to:
Posts (Atom)